WELCOME!
This blog contains quick tips for Bloggers. For detailed explanations do visit the main blog at :

Add Custom Search Google Web Element.
Google Web Elements makes it easy for you to add Custom Search
to your site or blog. Custom Search engine is used to only search your
site or those sites you specify. With Google Web Elements you can add it
in a post or in a HTML gadget in your blog :
To add this in your blog follow these steps :
1. Login at Google Custom Search.
2. Create your Custom Search Engine.
3. Click the 'Look and Feel' link in sidebar.
4. Click the link in "New! Use the new Custom Search Element to embed results in your webpage, providing a dynamic and inline experience to your users." at the top.
5. Copy and paste this snippet of code given into Edit Html tab of post editor or in a HTML gadget in sidebar.
Loading
To add this in your blog follow these steps :
1. Login at Google Custom Search.
2. Create your Custom Search Engine.
3. Click the 'Look and Feel' link in sidebar.
4. Click the link in "New! Use the new Custom Search Element to embed results in your webpage, providing a dynamic and inline experience to your users." at the top.
5. Copy and paste this snippet of code given into Edit Html tab of post editor or in a HTML gadget in sidebar.
Subscribe to this feed •
Written by Vin at Tips for Bloggers
• Stumble It! • Email the author • Save to del.icio.us • Add to del.icio.us • Digg This! • Share on Facebook • Discuss on Newsvine • Add to Mixx!
Links to this post
ADD BOOKMARK

Buy Vin a Beer :-) if you liked this post.
Skip to top of post.
How to Delete or Replace Picture.
Blogger does not have a delete command in the Post Editor. This
confuses the newbie who has after hours of struggling managed to upload a
picture to his blog only to find it too big or that t is the wrong
picture. Now he/she wants to delete or replace the picture with a new
one.
Follow these steps to delete a picture :
Then to upload another picture :
The picture will land up at top of the post. Cut and paste the code for the picture to put it where you want in the post.
Follow these steps to delete a picture :
- 1. Login at Blogger.com.
- 2. Click Edit Posts link for your blog on Dashboard.
- 3. List of Posts will open with Edit link for each post.
- 4. Click Edit link for the post which has the picture.
- 5. Post will open in Post Editor.
- 6. Click Compose tab in upper right corner of Post Editor.
- 7. If there is no Compose tab go to Settings----->Basic----->Show Compose Mode---->Select Yes----->Save.
- 8. In Compose tab of post editor click once on picture to select it.
- 9. Hit Delete key on Keyboard.
- 10. Click Publish button below Post Editor.
Then to upload another picture :
- 1. Click Add Image icon on Toolbar of Post Editor.
- 2. In Upload popup window click Browse to select image file from PC.
- 3. Choose size and position options.
- 4. Click Upload.
The picture will land up at top of the post. Cut and paste the code for the picture to put it where you want in the post.
Subscribe to this feed •
Written by Vin at Tips for Bloggers
• Stumble It! • Email the author • Save to del.icio.us • Add to del.icio.us • Digg This! • Share on Facebook • Discuss on Newsvine • Add to Mixx!
Links to this post
ADD BOOKMARK
Buy Vin a Beer :-) if you liked this post.
Skip to top of post.
Put Delicious Tag Cloud in Blog.

Using Delicious you can share web pages you found on the Internet with your friends. On finding a web page that is 'delicious' to you first bookmark it and then upload the bookmarks to delicious so you can share them with friends.
Your bookmarks can be categorized using tags. When you display a tag cloud the size of a tag denotes the number of your bookmarks associated with it. This gives an immediate indication to your viewers the subjects that you are most interested in. See picture at left.
To add a Delicious tag cloud to your blog follow these steps :
- Login at Blogger.com
- Click Layout link on Dashboard under blog title.
- Click Add Gadget link on Page Elements subtab.
- In popup window click HTML/Javascript gadget.
- In contents window copy and paste the code below :
<table width=200 border=1 frame=box cellspacing=0 cellpadding=10 ><tr><td bgcolor=white>
<script type="text/javascript" src="http://del.icio.us/feeds/js/tags/LOGIN_NAME?icon;count=150;size=12-35;color=87ceeb-0000ff;title=my%20del.icio.us%20tags;name;showadd"></script>
</td></tr></table>
In above code replace LOGIN_NAME with the Username you use to login at Delicious.com and save the gadget.
Subscribe to this feed •
Written by Vin at Tips for Bloggers
• Stumble It! (1 Reviews) • Email the author • Save to del.icio.us (6 saves, tagged: blog blogging blogs) • Add to del.icio.us • Digg This! • Share on Facebook • Discuss on Newsvine • Add to Mixx!
Links to this post
ADD BOOKMARK
Buy Vin a Beer :-) if you liked this post.
Skip to top of post.
Submit Blog to Social Networks with Followers Gadget.
Blogger introduced the Followers gadget in late August 2008 and it
was a great success. You could instantly sign up to follow a blog and
read the updates in The Reading List on your Dashboard and in your Google Reader.
In February 2009 they began the process of integrating the gadget with Google Friend Connect. While Followers was restricted to Blogger with Friend Connect you can follow any site or blog that has Friend Connect in it. You can use any one Google account, a Yahoo, AIM or OpenID account to follow sites or blogs.
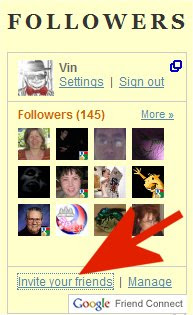
One little known feature of Friend Connect or Followers gadget is that you can submit the page you are on to any social networking site. Thus there is no need to add separate social networking icons below each post. To do this just click "Invite Your Friends" link in the Followers/Friend Connect gadget on the site you are on. See arrow in picture below :
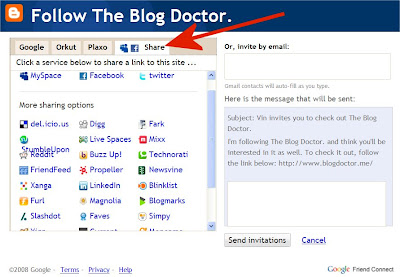
This will open a popup window. Click the Share tab in the popup window as shown in picture below :
Click on the link for any of the following social networks :
You will be prompted to login and once you have Registered or logged in just click Submit to Share what you are looking at with all your friends. You can do this to Twitter or Digg your own posts and thus increase traffic to them.
In February 2009 they began the process of integrating the gadget with Google Friend Connect. While Followers was restricted to Blogger with Friend Connect you can follow any site or blog that has Friend Connect in it. You can use any one Google account, a Yahoo, AIM or OpenID account to follow sites or blogs.
One little known feature of Friend Connect or Followers gadget is that you can submit the page you are on to any social networking site. Thus there is no need to add separate social networking icons below each post. To do this just click "Invite Your Friends" link in the Followers/Friend Connect gadget on the site you are on. See arrow in picture below :

This will open a popup window. Click the Share tab in the popup window as shown in picture below :

Click on the link for any of the following social networks :
- MySpace
- del.icio.us
- Digg
- Fark
- StumbleUpon
- Live Spaces
- Mixx
- Buzz Up!
- Technorati
- FriendFeed
- Propeller
- Newsvine
- Xanga
- Blinklist
- Furl
- Magnolia
- Blogmarks
- Slashdot
- Faves
- Simpy
- Yigg
- Current
- Meneame
- Diigo
- Funp
- Hugg
- Kirtsy
- Sphinn
- Dealspl.us
You will be prompted to login and once you have Registered or logged in just click Submit to Share what you are looking at with all your friends. You can do this to Twitter or Digg your own posts and thus increase traffic to them.
Subscribe to this feed •
Written by Vin at Tips for Bloggers
• Stumble It! • Email the author • Save to del.icio.us • Add to del.icio.us • Digg This! • Share on Facebook • Discuss on Newsvine • Add to Mixx!
Links to this post
ADD BOOKMARK
Buy Vin a Beer :-) if you liked this post.
Skip to top of post.
Create permanent links to posts in Layout Templates.
Blog Posts have a link or an address on the web immediately on publication. These are called Permanent Links or Permalinks. Draft posts are not published and hence do not have an address on the web.
These links are termed as Permanent Links because they cannot be changed once they are published. In the Layout Templates the Post Titles are linked automatically to their links. Hence clicking on the post title brings up the post page with the permalink in the address bar. To go back to the Home Page simply click the Blog Header. If you want the permalink of the post you can right click the title and choose 'Copy Shortcut'. You can also do this with the post timestamp below the post since it is also linked to the permalink.
II however, you want a separate link under the post titled 'Permalink' follow these steps :
1. Login at Blogger.com.
2. Click Layout link on the Dashboard.
3. Click Edit Html subtab of Layout tab.
4. Click Download Full Template link and save the template file to your disk as a backup.
5. Click the Expand Widgets Template checkbox above the Template Code box.
6. Wait for page to refresh and scroll down o this code in the Blog Posts widget :
<p class='post-footer-line post-footer-line-1'>
Immediately below the above code paste the code given below :
<a class='timestamp-link' expr:href='data:post.url' title='permanent link'>PERMALINK</a>
7. Save Template.
Subscribe to this feed •
Written by Vin at Tips for Bloggers
• Stumble It! • Email the author • Save to del.icio.us • Add to del.icio.us • Digg This! • Share on Facebook • Discuss on Newsvine • Add to Mixx!
Links to this post
ADD BOOKMARK
Buy Vin a Beer :-) if you liked this post.
Skip to top of post.
Copy Paste from Microsoft Word gives Errors!
Blogging activities mainly consist of creating and publishing posts once you have set all the settings for your blog. Sometimes it may be that you have large amount of content in Microsoft Word documents which you wish to transfer to your blog.
The easiest method would be to select all the text in the document and copy it and paste in Compose tab of Post Editor. Now when you click the Publish button you will get this error :
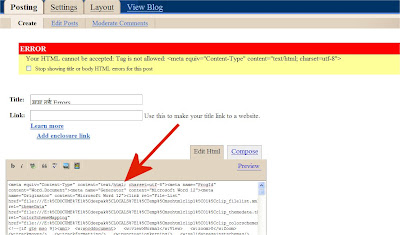
The arrow points to that tag in the post which you can see after clicking the Edit Html tab in the upper right corner. Now if you try to delete it and click Publish you will get another error :
Delete this tag and click Publish to get yet another error :
Delete this and click Publish to get yet another error :
This will continue as Microsoft Word uses these tags which are incompatible with the Blogger Post Editor. The only way to get rid of these warnings is to first copy and paste from Word to Notepad or to any other text editor. Then copy and paste from there to Blogger Post Editor.
Then format the post.
Then click Publish.
Enjoy!
The easiest method would be to select all the text in the document and copy it and paste in Compose tab of Post Editor. Now when you click the Publish button you will get this error :
ERROR
Your HTML cannot be accepted: Tag is not allowed:
<meta equiv="Content-Type" content="text/html; charset=utf-8">

The arrow points to that tag in the post which you can see after clicking the Edit Html tab in the upper right corner. Now if you try to delete it and click Publish you will get another error :
ERROR
Your HTML cannot be accepted: Tag is not allowed:
<meta name="ProgId" content="Word.Document">
Delete this tag and click Publish to get yet another error :
ERROR
Your HTML cannot be accepted: Tag is not allowed:
<meta name="Generator" content="Microsoft Word 12">
Delete this and click Publish to get yet another error :
ERROR
Your HTML cannot be accepted: Tag is not allowed:
<meta name="Originator" content="Microsoft Word 12">
This will continue as Microsoft Word uses these tags which are incompatible with the Blogger Post Editor. The only way to get rid of these warnings is to first copy and paste from Word to Notepad or to any other text editor. Then copy and paste from there to Blogger Post Editor.
Then format the post.
Then click Publish.
Enjoy!
Subscribe to this feed •
Written by Vin at Tips for Bloggers
• Stumble It! • Email the author • Save to del.icio.us • Add to del.icio.us • Digg This! • Share on Facebook • Discuss on Newsvine • Add to Mixx!
Links to this post
ADD BOOKMARK
Buy Vin a Beer :-) if you liked this post.
Skip to top of post.
Add Your Site Feed to Reader's Blog.
When viewers find your site interesting they add your site
feed to their Google Reader or Bloglines in order to read the latest
updates without having to visit it repeatedly.
To increase your feed readers you can also provide a button which when clicked will allow viewers to add your site feed to their blogs with a single click. This way viewers of their blogs will also see your site feed and can click on the post titles they find interesting. This will increase traffic to your site and give it more exposure.
Here are the steps to construct the code for the "Get Posts From MySite on Your Blog" button. I am using Vintip.com as an example site :
http://feeds.feedburner.com/TipsByVin
Click 'Generate Javascript' button. Code is generated. Copy that code. This is the code I got for my example site Vintip.com :
<script language="JavaScript" src="http://itde.vccs.edu/rss2js/feed2js.php?src=http%3A%2F%2Ffeeds.feedburner.com%2FTipsByVin&chan=n&num=0&desc=0&date=n&targ=y" type="text/javascript"></script>
<noscript>
<a href="http://itde.vccs.edu/rss2js/feed2js.php?src=http%3A%2F%2Ffeeds.feedburner.com%2FTipsByVin&chan=n&num=0&desc=0&date=n&targ=y&html=y">View RSS feed</a>
</noscript>
Click the Encode button. A fresh code text box will appear lower down. Copy the code in it.
Open Notepad or any text editor on your PC. Copy and Paste in it the code below :
<form action="http://beta.blogger.com/add-widget" method="POST">
<input value="Posts From MYSITE.COM" name="widget.title" type="hidden"/>
<textarea style="display:none;" name="widget.content">
COPY AND PASTE THE CODE FROM STEP 3 HERE.
</textarea>
<input
value="http://tips.blogdoctor.me/2008/12/add-your-site-feed-to-reader-blog.html" name="infoUrl" type="hidden"/>
<input
value="http://www.blogger.com/img/icon_logo32.gif" name="logoUrl" type="hidden"/>
<input value="Get MYSITE.COM Posts on Your Blog" name="go" type="submit"/>
</form>
<p>Click above button to get posts from this site on your blog</p>
<li><a href="http://tips.blogdoctor.me/2008/12/add-your-site-feed-to-reader-blog.html">Get This Gadget on Your Site.</a></li>
In above where you see "COPY AND PASTE THE CODE FROM STEP 3 HERE" paste the escape code obtained at the end of Step 3 there.
Also replace "MYSITE.COM" with actual name of your site.
Save the text file as widget_installer_code.txt.

Click the button on the site and the Add Page Element popup window will open if you are logged in at Blogger.com :

Click Edit Content arrow and you will see the code generated by converting Feed URL of your site into Javascript in Step2 above. The reader can choose which of his blogs he can insert the code in by clicking the drop down arrow in Select a Blog textbox and then clicking Add Widget button adds it to that blog. Here is how it looks once installed on another blog :
Enjoy!
To increase your feed readers you can also provide a button which when clicked will allow viewers to add your site feed to their blogs with a single click. This way viewers of their blogs will also see your site feed and can click on the post titles they find interesting. This will increase traffic to your site and give it more exposure.
Here are the steps to construct the code for the "Get Posts From MySite on Your Blog" button. I am using Vintip.com as an example site :
1. Get Feed URL of your Site.
The first step is to get the feed URL or the address of the site feed. In this case the feed URL for my site is :http://feeds.feedburner.com/TipsByVin
2. Convert Feed URL to Javascript.
The second step is to convert the Feed URL to Javascript code. For this go to any site which does this ( Google for 'RSS to Javascript' ) or use the Feed2JS site. Enter the web address of the RSS Feed obtained in Step 1 above in the yellow URL box. Choose the various options and click the Preview button. If the feed URL is entered correctly you should see the posts listed from your site according to the options you chose.Click 'Generate Javascript' button. Code is generated. Copy that code. This is the code I got for my example site Vintip.com :
<script language="JavaScript" src="http://itde.vccs.edu/rss2js/feed2js.php?src=http%3A%2F%2Ffeeds.feedburner.com%2FTipsByVin&chan=n&num=0&desc=0&date=n&targ=y" type="text/javascript"></script>
<noscript>
<a href="http://itde.vccs.edu/rss2js/feed2js.php?src=http%3A%2F%2Ffeeds.feedburner.com%2FTipsByVin&chan=n&num=0&desc=0&date=n&targ=y&html=y">View RSS feed</a>
</noscript>
3. Convert HTML code to Escape characters.
The code generated in Step 2 is in HTML. It will work if you paste it directly in a HTML gadget in your blog. However we need to provide it to our readers in a gadget to place on their blog. To do this we need to convert HTML characters like '>' and '<'. You can do this the hard way by converting each character or the easy way by using sites which provide this service free. Copy the code generated in Step 2 and paste it in the box provided at the HTML escape site.Click the Encode button. A fresh code text box will appear lower down. Copy the code in it.
4. Creating the Blogger Widget Installer.
In this step we will create the Blogger Widget Installer. Clicking the button on this installer on your site will add your site posts to reader's blog.Open Notepad or any text editor on your PC. Copy and Paste in it the code below :
<form action="http://beta.blogger.com/add-widget" method="POST">
<input value="Posts From MYSITE.COM" name="widget.title" type="hidden"/>
<textarea style="display:none;" name="widget.content">
COPY AND PASTE THE CODE FROM STEP 3 HERE.
</textarea>
<input
value="http://tips.blogdoctor.me/2008/12/add-your-site-feed-to-reader-blog.html" name="infoUrl" type="hidden"/>
<input
value="http://www.blogger.com/img/icon_logo32.gif" name="logoUrl" type="hidden"/>
<input value="Get MYSITE.COM Posts on Your Blog" name="go" type="submit"/>
</form>
<p>Click above button to get posts from this site on your blog</p>
<li><a href="http://tips.blogdoctor.me/2008/12/add-your-site-feed-to-reader-blog.html">Get This Gadget on Your Site.</a></li>
In above where you see "COPY AND PASTE THE CODE FROM STEP 3 HERE" paste the escape code obtained at the end of Step 3 there.
Also replace "MYSITE.COM" with actual name of your site.
Save the text file as widget_installer_code.txt.
5. Put Widget Installer in Your Site.
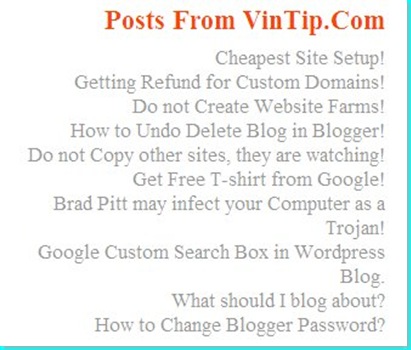
In the last step we put the Widget Installer in your site. To do this simply copy all in the widget_installer_code.txt file created in Step 4 above and paste it in appropriate place in your site template and save. Here is what it looks like in the right column of my site Tips by Vin :
Click the button on the site and the Add Page Element popup window will open if you are logged in at Blogger.com :

Click Edit Content arrow and you will see the code generated by converting Feed URL of your site into Javascript in Step2 above. The reader can choose which of his blogs he can insert the code in by clicking the drop down arrow in Select a Blog textbox and then clicking Add Widget button adds it to that blog. Here is how it looks once installed on another blog :

Enjoy!
Subscribe to this feed •
Written by Vin at Tips for Bloggers
• Stumble It! • Email the author • Save to del.icio.us (tagged: system:unfiled) • Add to del.icio.us • Digg This! • Share on Facebook • Discuss on Newsvine • Add to Mixx!
Links to this post
ADD BOOKMARK
Buy Vin a Beer :-) if you liked this post.
Skip to top of post.
How to Follow a Blog without the Followers Gadget.
Blogger
introduced the Followers Gadget to introduce social networking. By
adding the gadget to your blog you can build up a community round your
blog.
It is also a means of adding subscribers to your blog feed. Those that follow your blog are automatically subscribed to blog updates through the feed. If you are already subscribed to the blog feed you do not automatically appear in the Followers gadget. Even after becoming a follower you can choose to remain anonymous.
What if the blog does not have a Followers gadget? How do you 'follow' it? If it has a Subscribe to my feed icon at the top of the sidebar you can add it to your Google Reader or any other feed reader and follow the updates. You can also subscribe to email notifications if the blog offers it. This does not add you as a follower on the Dashboard of that blog. You can also look for the 'Subscribe to Posts (Atom)' link which is at the bottom of the posts in a Blogger layout template. If neither of these are there try adding any of the following feed links to a feed reader :
http://yourblogname.blogspot.com/feeds/posts/default
http://yourblogname.blogspot.com/feeds/posts/default?alt=rss
http://yourblogname.blogspot.com/atom.xml
http://yourblogname.blogspot.com/rss.xml
Substitute actual blog name in place of yourblogname.
To add yourself as a follower on blogs not having the Followers Gadget or a subscribe icon you have to first find out the BlogID which is a big number found in the page source of the blog. Open the bog in a browser and then go to View----->Page Source in the browser menu. A text file will open. Search in it for 'BlogID' and copy down the number.
Paste the BlogID number in the URL below in place of 'NUMBER' :
http://www.blogger.com/follow-blog.g?blogID=NUMBER&blogTitle=WORD1+WORD2+WORD3+...
Then add each word of the same blog title instead of 'WORD1+WORD2+WORD3+...' . Copy the modified URL and paste it in address bar of a browser window and hit Enter key on keyboard.
In the next window you will be asked to choose whether to follow the blog publicly or anonymously. Choose one and click Follow. If you do not want to then click Cancel.
Enjoy!
Subscribe to this feed •
Written by Vin at Tips for Bloggers
• Stumble It! (1 Reviews) • Email the author • Save to del.icio.us • Add to del.icio.us • Digg This! • Share on Facebook • Discuss on Newsvine • Add to Mixx!
Links to this post
ADD BOOKMARK
Buy Vin a Beer :-) if you liked this post.
Skip to top of post.
Subscribe to:
Posts (Atom)
No comments:
Post a Comment